
We have 2 options to install Load balancers at the moment.
- Make auto installation fixed
- Directly install LB manually
It’s always recommended to backup things first like config file and databases etc.
Xtream UI LB Setup Video Tutorial
Fix Xtream UI Auto LB installation On Main Server:
To make auto installation of loadbalancer working fine, you must run following command on MAIN SERVER before adding a new LB.
After this, go for Load Balancer Installation from navigation menu and must add following data correctly:
Server IP: This is your new dedicated server or Loadbalancer IP address.
Root Password: This is the root password of your same new load balancer.
Install Xtream-UI Load Balancer Manually
- Get MySQL password
- Login to root via PuTTY
- Start installation script
- Select LB, yes, hit enter
- Installation completed
- Reload Manage Servers page and your LB is now online
That was the quick installation guide,
Getting MySQL root password for user_iptvpro from db xtream_iptvpro
You need to do this only if you havn’t already copied and saved main server’s MySQL password for user_iptvpro. In cause you haven’t this password, run following command to get.
You’ll get an output like:
So, there we got MySQL password we’ll be asked while installing the loadbalancer manually.
Logging to New Dedicated server (Loadbalancer)
Now login to your new loadbalancer dedicated server via PuTTY, if you don’t know how to do or getting error this article may help.
Starting Installation For New Loadbalancer:
First of all login to your admin Panel, from navigation menu go to Add Load Balancer, Add your dedicated server hostname/custom name or IP, then add your server IP and fill other fields if you know how to or leave rest blank and now it should look like this:

Adding New LB Name and IP address
Finding Correct Network Interference ID
Now, to next Advance Field the field we must need to update is called Network Interference which is by default
. This helps us keep showing correct and real time upload and download data so we can keep eye on our bandwidth running out of limit or in range. To get your server’s correct Network Interference ID, run following command.
Now the output data be like:
Here our Network Interference ID is
so, we’ll type this to relevant field and add this new loadblanancer. It will look like this now:

Add Load Balancer_advance_field
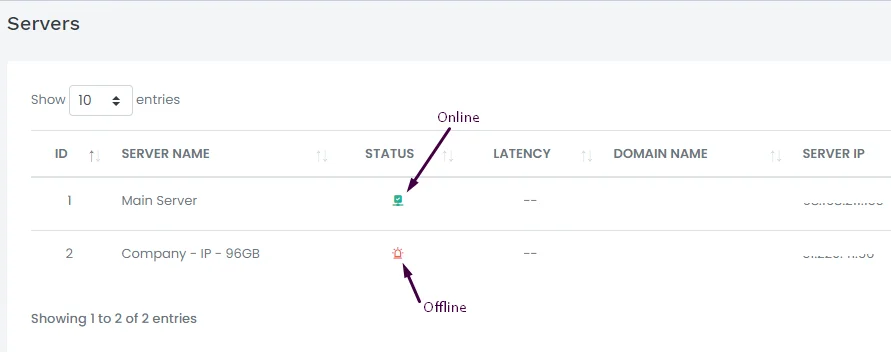
Now get back to navigation menu and Manage Servers. There you’ll see a new load balancer has been added but status is offline and also you can see a disabled WiFi icon at right upper side which indicates that one or more of your loadbalancers are down. It will now look like this:
Running Installation Script For Xtream UI Load Balancer:
Now, get back to PuTTY of your loadbalance server and from mirrors you can run the command to get installation menu. Like we’re gonna use our following installation script.
So, here you’ll get a menu having 3 or 2 options and one of these will be LB which is actually shortname of LoadBalancer.
You need to type LB and hit enter so it will start installation process for LoadBalancer. It will now ask you some data to be entered, following is how you can correct add the data.
: Here you need to add your admin panel IP
: This is the password of main server MySQL password for user user_iptvpro and database xtream_iptvpro. You can get from above method we shared to get this data.
: This add ID of loadbalancer you can get my logging into admin panel ==> manage servers ==> relevant loadbalancer ID number at left side. Following is the map of where and how to add this data correctly.

Loadbalancer installation commands and scripts
Taking LoadBalancer Online:
You need to reload the page Manage Servers and see if loadbalancer is already online. If not run following command on LB server and it should be online and after this you can use it as you want.
It should be now like this.

LoadBalancer Before and After installation
So finally you have successfully installed and make the loadbalancer running fine.